Sunday, August 12, 2018

How to Fix Screen Recording Can’t be Saved & Record Screen Not Working, Can’t Play: MacOS Mojave & Earlier

How to Fix Screen Recording Can’t be Saved & Record Screen Not Working, Can’t Play: MacOS Mojave & Earlier

Screen Recording Can’t be Saved & Record Screen Not Working, Can’t Play: MacOS Mojave & Earlier


Your Screen Recording Can’t be Saved or Screen Recording is not saving in your drive after stop screen recording and Won’t Play in Preview. There are too many reasons and helpful troubleshooting tips to fix it yourself. MacOS Mojave and Earlier OS X running Mac we can use Free screen recorder by apple. But Apple makes massive changes in Functionality and Features that make screen recording more user-friendly and easy.

Shift + Command + 5 doesn’t work for taking screenshot or Record Video, Record screen on Mac (We have an alternate free screen recording, Restart your Mac and Check, also try QuickTime Player, Follow my guide to use QuickTime for record video).
Related Reading:


Best Free Video Downloader Apps for iPhone/iPad in 2018


How to Unlock a Disabled iPhone Without iTunes


iOS Mirror Apps to Wireless Stream Your iPhone/iPad Display


Screen Recording stuck and crashing, Stop automatically after some time or interval. Remove recording timer 5 seconds, 10 seconds to None.You may also like:

Gihosoft Free Android Data Recovery can help you easily recover lost data such as photos, videos, contacts, text messages, WhatsApp & Viber chats from Google Pixel/XL or other Android phones effortlessly.

how to recover data after factory reset android free
Troubleshooting guide: Screen Recording not Working, Can’t be Saved on Mac
Fix 1: Recorded Screen video won’t play

Last time when I try to record my Mac running MacOS Mojave, Video Doesn’t play and save on Mac. Error message is saying – Your Screen Recording Can’t be Saved.

I am using Full screen recording with microphone (record screen with audio). At that time microphone not working due to hardware issues. After I disabled microphone, That’s work fine for me.

Use Keyboard Shortcut keys: “Shift + Command + 5“.

Select Record screen, Click on “Options” > Set microphone to “None”.


Or Fix your Microphone problems on Mac, That help to fix the issues for Screen Recording audio not working on Mac
Fix 2: Check for Software Update On Mac

Go to the Apple Logo on your Mac.

Next, Tap on System Preference.

Now, Find and Tap on Software Update.

Wait for few seconds to check and get the Software update. Update if available.
Fix 3: Restart your Mac

Internal software glitch and hardware issues we can re-fix with the simple restart. My Mac mini affected with the issues of Keyboard Shortcut (Shift + Command + 5) for Take Screenshoot or Start Video Recording not working or not start.

Go to the Apple menu > Apple logo > Restart.

Or, Use Power button for force restart or turn off your Mac, iMac, MacBook Pro, MacBook Air.

Delete Screen Recorder Plist file from Library on Mac

Open Finder on Mac and Go to the Top menu, Go > Go to Folder….

Enter the below command line: ~/Library/Preferences/

Tap on the Go button.

Search “Screen” file using the Search box, Select Folder Directory and Quickly find your find.


Copy this File for Backup and Save to other folder or place.

Delete this File under Library folder. Check now screen recording works or not.

Otherwise, restart your Mac and Check it to get effect 100%.

Thanks.
Fix 4: Screen Recording stop automatically

May be you applied the time limit to capture or record video. See the option for record screen for a specific time: 5 Seconds or 10 Seconds to None.


Shift + Command + 5 Not working on Mac to Capture Video or Screenshoot. – (Recommend restart your Mac or Use Quick Time Player)
Fix 6: Quick Time Player has still in use

Open Quick Time Player on Mac using Spotlight Search (Command + Space).

Right Click on Quick Time Play icon showing on the dock, Select “New Screen Recording”.

Start to record screen by click on Button on Quick Time player.

Now, Click to record full screen or Drag to the selected part to be recorded.

Don’t miss to save your task before close it.

> Your iPhone have no enough space to save – Free Up space on iPhone.

If you accidentally lost important data on iPhone, feel free to try Gihosoft iPhone Data Recovery.


Any app suggestion or topic recommendation is appreciated in the comments below.

[Solution]How to Fix Change iPhone Notification Ringtone 2019


[Solution]How to Fix Change iPhone Notification Ringtone
How to Change iPhone Notification Ringtone?
1Change iPhone Notification Ringtone for Incoming Phone Calls on iPhone:

Follow the steps below to change iPhone notification ringtone for incoming phone calls.

Step 1.The first thing that you need to do is to open the Settings on your iPhone.

Step 2.Then, click on Sounds (Sounds & Haptics for some version) and go to Ringtone.

Step 3.You can view the list of ringtones that are available on your iPhone.

Step 4.Click on the ringtone that you would like to select. You can even preview tune before choosing it.


2Change iPhone Notification Ringtone for Incoming Text Messages on iPhone:

It is pretty much the same as changing notification ringtone for phone calls above. Follow to change the sound effect for all messages coming to your iPhone.

Step 1.First, you have to go to Settings and click on “Sounds” (Sounds & Haptics for some version).

Step 2.Next, you must click on the “Text Tone” button and you can choose any ringtone you like. There are custom ringtones under the section Ringtones, while the default will appear under the Original segment.

Step 3.You can select the ringtone you like and close the Settings.


Part 2: Top 3 Websites For iPhone Notification Ringtones Free Download

If you are fed up with your default iPhone ringtone, you will not be alone. There are thousands of iPhone users who are tired of listening to their default ringtone and want to have customized sound effect. Here are top 3 websites for you to download iPhone notification ringtone.
#1: Zedge

One of the top sites to get your favorite ringtone is Zedge. This site has a lot to offer, from wallpapers to ringtones to notifications to games. You can easily search for any ringtone of your favorite movie or TV series or games. It has a collection of ringtones from classic to rock and country. Before you can download the ringtone, you can listen to it. The good news is that it is for free, and you can download ringtone to your iPhone or computer.
#2: Mob.org

Another great website to download iPhone notification ringtone is Mob.org This website offers a wide range of ringtone to download freely. It allows you to listen to any ringtone by searching under the list of artist and genre. The downloading of ringtone is easy; all you have to do is click the download button or scan the QR code. Moreover, you can download wallpapers, themes, and games available on the website.You may also like:

free photo recovery software

If you lost videos from iOS Camerall Roll which are nowhere to download again, you can use Gihosoft iPhone Data Recovery to get back deleted videos from iOS device including iPhone, iPad and iPod Touch.Please check jihosoft iphone data recovery
#3: Tones7

For iPhone notification ringtones free download, you can visit Tones7. This site is perfect for downloading ringtones for iPhone. Looking for various ringtones is easy as ringtones are categorized. The simple design of the website makes it convenient to download as many ringtones as you like. This website enables you to listen to the ringtones before you can download them. You can find both MP3 and M4R ringtones.

You may also like:

If you ever lost or accidentally deleted data from your iOS device, you can use the professional Gihosoft iPhone Data Recovery software to retrieve important data from iPhone, iPad or iPod Touch even without backup.

Jihosoft iPhone Backup Extractor Extract and recover all types of data from iPhone backup files, such as camera roll photos, videos, SMS, contacts, reminders, WhatsApp, and etc.

Saturday, June 16, 2018

3 Simple Ways to Solve “iPhone Keeps Going to Lock Screen” Problem

3 Simple Ways to Solve “iPhone Keeps Going to Lock Screen” Problem


The following are the basic solution to fix “iPhone keeps going to lock screen” issue. You can choose any of these solutions as a way to troubleshoot your iPhone.
1. Reboot Your iPhone


The following steps describe various ways to reboot different versions of iOS devices.


For iPhone X/8 Plus: Press the Volume Up button and quickly release it, then press and hold the Volume Down button and quickly release it, and finally press and hold the Power button until Apple logo appears on your iPhone screen.


For iPhone 7: Simultaneously press the On/Off button and the Volume Down button as the screen turns off and then turns back on and shows the Apple logo.


For iPhone SE/6s and earlier versions: Instantaneously press the Home and Power button, keep holding them until you see the Apple logo.


2. Reset all iPhone Settings


You can reset your iPhone iOS settings by following these steps:


Go to the Settings app and click on it.


Click “General > Reset > Reset All Settings".


Enter your Apple Password and confirm your request.


3. Update to The Latest iOS Version


Updating your iOS to the latest version can help to solve ‘iPhone keeps going to lock screen” issue.


Step 1: Launch iPhone Settings app from your Home screen.


Step 2: Click “General > Software Update > Download and Install”.


Step 3: Enter your Apple ID passcode, tap Agree to the Terms and Conditions and then tap Agree again to Confirm.Gihosoft iPhone Data Recovery is a professional iPhone Data Recovery software to get back all your lost text message, photo, video, call history, note, contact and more from iPhone/iPad/iPod Touch. It offers a full solution to recover your lost data in different tough situations. Besides recovering data directly from iPhone, iPad and iPod touch, it also allows you to recover data from iCloud and iTunes backup files.


iPhone Unlock Service: Unlock Base

iPhone Unlock Service: Unlock Base


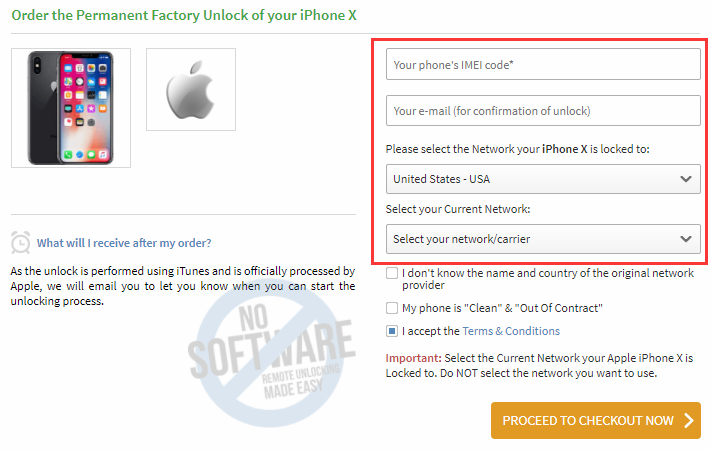
The Unlock Base offers iPhone and Android phone unlocking service to all. This service is quite affordable and they would ensure that you know the amount to pay before proceeding to the checkout page.
Steps to Unlock A Carrier Lock iPhone using Unlock Base


Step 1: Go the main website. Choose your manufacturer and the model. Then click “Unlock Now” from the main menu.Sponsor Ads:


Gihosoft iPhone Data Recovery is a professional iPhone Data Recovery software to get back all your lost text message, photo, video, call history, note, contact and more from iPhone/iPad/iPod Touch. It offers a full solution to recover your lost data in different tough situations. Besides recovering data directly from iPhone, iPad and iPod touch, it also allows you to recover data from iCloud and iTunes backup files.


Step 2: Enter your iPhone’s IMEI number, your country, and the network you are using. Click “Proceed to Checkout Now”.


Step 3: Make payments, and you will be sent your SIM network unlock PIN. Use it to unlock your iPhone.

Wednesday, August 16, 2017

How to save a webpage to read later in Google Chrome on your iPhone ?

Google Chrome is the leading web browser on the market. Google’s web browser also has its own ground on iOS where Safari now dominates. Google Chrome provides tons of exciting features that are missing from other competitors out there.
If you now have a modern version of Google Chrome on your iPhone, you will be happy to know that you now can save stories or webpages for offline reading on your iPhone. This is a great feature especially if you come across something interesting while reading online that you want to save for offline access.
In this tutorial, we will run you through the steps to save a webpage in Google Chrome for offline reading on your iPhone. Before proceeding with our step-by-step guide, head to the App Store and update the Google Chrome app.Must Read:how to restore contacts on iPhone without backup
Must Read:how to free up space on iphone

Steps to save a webpage to read later in Google Chrome on your iPhone

Step one: First off, you need to launch Google Chrome from your home screen and then hit the menubutton (It looks like the horizontal three dots) Must Read:how to restore contacts on iPhone without backup
Must Read:how to free up space on iphone
Step two: Next up, tap on the share button located at the top of the menu. From here, all you need to do is to tap on Read Later option to save the webpage
Step three: To access your newly-saved webpage, tap the menu button and select Reading List from the drop-down menu
Step four: Here, you will see all of the stories or webpages you have already saved in Google Chrome. You simply need to tap on a story for offline reading.

Steps to remove a saved webpage in Google Chrome on your iPhone

Step one: Launch Google Chrome from your iPhone’s home screen and then hit the Menu button at the top right corner of the screen
Step two: From the list of options, select Reading List. After that, hit the Edit button at the bottom right corner
Step three: Next up, select a story you wish to remove and hit the Delete button at the bottom left to delete it.

Wednesday, August 9, 2017

Hidden features of iPhone will simple make you say WOW!

Each of Apple’s iPhone series handsets have always come with highly advanced and powerful technology, with a beautiful body to boot. Whichever iPhone model it is that you have, you know it can work fast, answer all your queries and even click awesome pictures and videos.


As we always tell there are tons of hidden features and tricks available on iPhone which need to be explored. These features are designed by Apple to make your life easier and with each new iPhone launch the list just keeps getting bigger.

While some of the iPhone features are hidden in plain sight, some really require you to dig deep into the iOS software to spot them. They’re all quite rewarding at the end of the day though; so, it’s all worth it.


Today in this article we are going to talk about the five such hidden features which can change the way you use your device.

Must Read: 8 iPhone & iPad features that will be added with iOS 11

Lock autofocus and exposure

To access this cool iPhone feature, you need to first decide upon the point where you want the iPhone camera to focus. You must then long-press on that point, and the focus as well as the exposure will get locked instantly.


To undo this iPhone feature, or to set another point for focus and exposure, you can tap anywhere on the screen again. As you can see in the picture accompanying this tip, an icon saying AE/AF Lock will be on the screen for as long as you have decided to keep the lock on.

Must Read: iOS 11 beta 4 reveals one of the cool features for iPhone and iPad users

Shake to undo

Here’s one of the best iPhone tips for texts, emails, WhatsApp and so on. Did you know, there’s a much simpler way of getting rid of the words you just typed than pressing backspace? All you need to do is shake your phone a little to bring up a box that will ask you whether you wish to undo your typing. If you change your mind after erasing it, don’t worry!

Must Read:How to fix iPhone error 21 ?

Just shake your iPhone once again to redo your typing. This iPhone feature has a downside though as it can work involuntarily when the device gets shaken accidentally. So if you’re not keen on using it, we’d suggest you switch it off by going into Settings > General > Accessibility and turning off the Shake to Undo option.

Keyboard Shortcuts

One of the most handy and best iPhone feature is the keyboards shortcut function which allows you to set a small phrase which you can type in order to avoid typing a large one all the time. For instance, if you find yourself often texting ‘Feed the dog’ to your other half, you can set up your keyboard shortcut for that phrase as ‘ftd.’

Read More: These tips will help your iPhone battery last for more than a day

You can access this iPhone feature via Settings > General > Keyboard > Shortcuts. While one of them will ask you to insert the exact phrase you wish to save, the other one requires you to put in the shortcut for it. Once you hit save, you can access this shortcut inside any app that uses the default keyboard.

Must Read:How to download kik videos ?

Use Word as a password

The fingerprint scanner feature comes in all latest iPhone models but most people avoid using the fingerprint scanners on their iPhones in favor of numbered passcodes. But if you wish to avoid them both and go for a word as your passcode, you can do so as well. You will need to enter Settings > General > Passcode Lock and turn on the Simple Passcode option.

Must ReadOne of the Biggest features of iPhone 8 has been removed

It is particularly useful for those who own old iPhone models that did not come with any fingerprint scanners on them, it’s good that Apple has included the fingerprint scanner feature in all the latest iPhone models. But for old iPhone handset users, the passcode is the only native security feature that can be taken advantage of.

Forgot iPhone Passcode?

Part 1. If I Reset My iPhone What Will I Lose?

After encountering a major setback in your device and the only available solution is to reset, then you need to know that you will lose some data and files (if not all). However, different reset leads to different results.
There are different kinds of reset method, these methods determine the outcome of your device and answer the question: “If I reset my iPhone, will I lose everything?”. These methods include:
A Reset Through Settings on iPhone
This is a conventional method and it is very easy. It involves only your device and tapping a few buttons in order to restore the phone. In this method, there are 2 approaches to this;
  1. If you reset all settings, it will only be temporary and not all files or data will be lost. In fact, some junk and temp files i.e. it keeps your apps and data but will reset all personal preferences and network settings.
  2. If you erase all content and settings, it will delete all data on your iPhone, including songs, videos, images, etc. It is somewhat similar restoring back to factory settings.
B Reset Through iCloud and iTunes
One of the available methods Apple has put in place for iPhone users to reset their phones. It involves making a connection with a PC and logging into iCloud or launching iTunes respectively. This method is however complicated but resets through iTunes and iCloud will make you lose all your files and data; more like restoring back to factory settings. If you need to get back your data you may need to get help from some professional recovery tool.

Part 2. How to Restore iPhone after Reset via iTunes

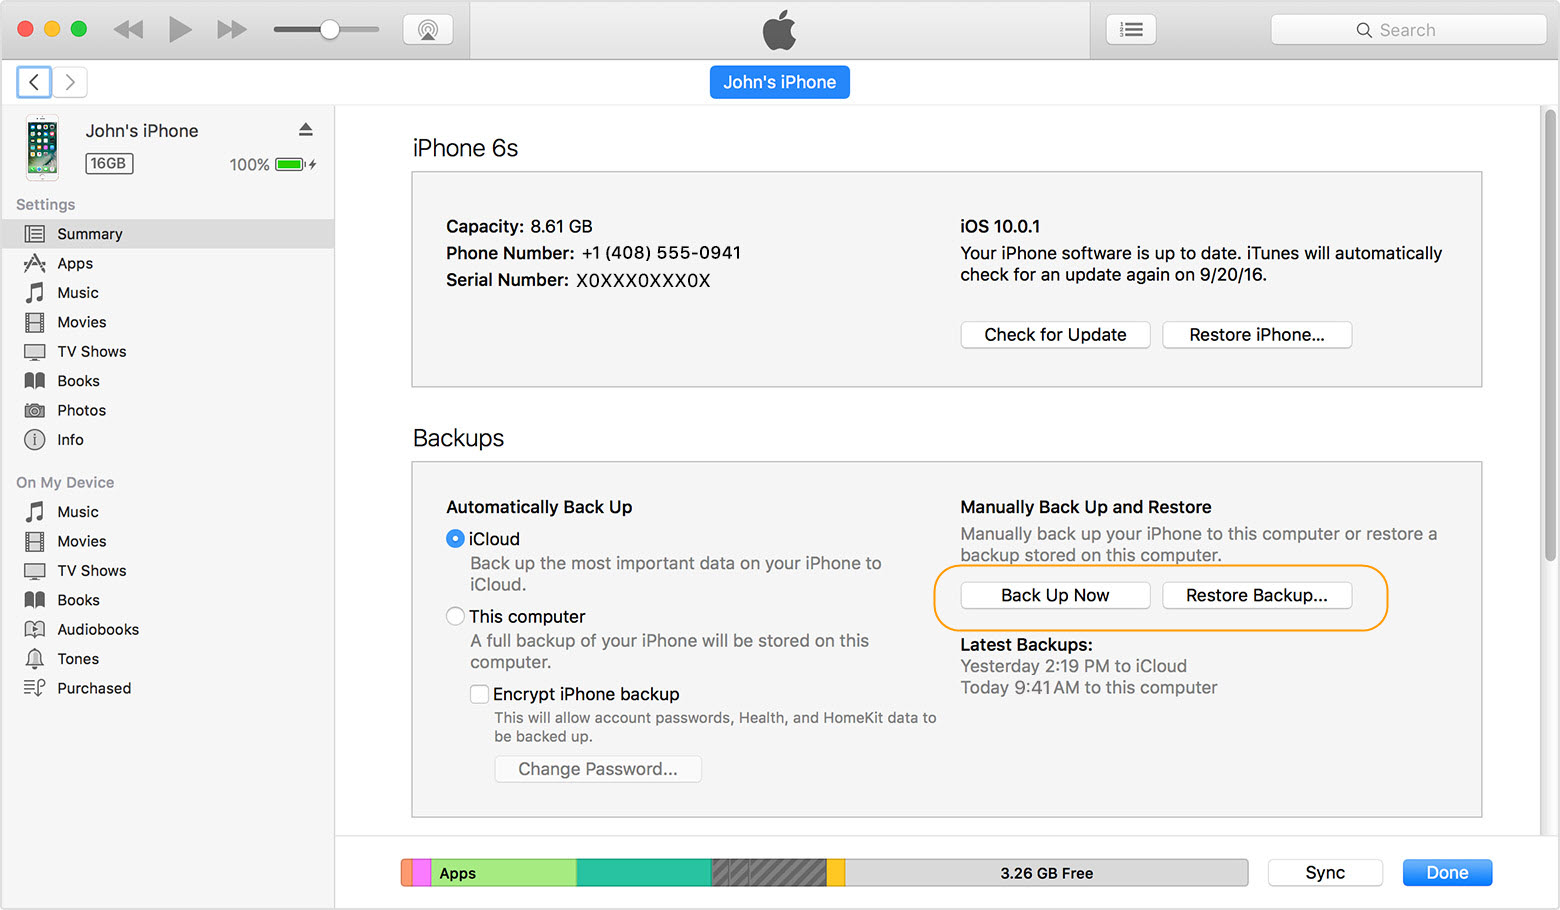
When you reset iPhone with any of the method listed above, no doubt, some important files could be deleted or lost and you would want to restore them. In order to do this, you can restore iPhone from an iTunes backup if you have backed up before. Apple set up this method so the maximal use of iTunes can be put into action and one can be able to backup devices in case of future problems.
Step 1: Connect your iPhone to a PC.
Step 2: Make a quick launch of iTunes and go to File menu, select “Devices”.
Step 3: Choose “Restore Backup”.
restore from iTunes
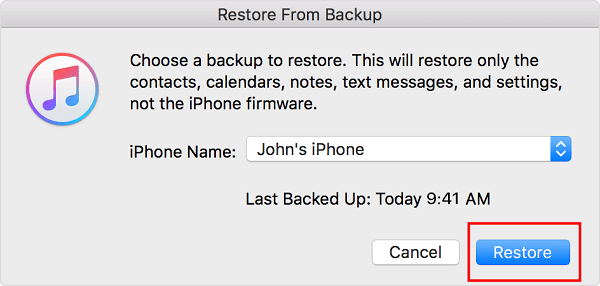
Step 4: Pick a recent backup on the basis of size and date, and click on “Restore”.
restore from iTunes
After all these steps, you now have your iPhone restored via iTunes, and this is also very useful also after reset.If you ever lost or accidentally deleted data from your iOS device, you can use the professional Gihosoft iPhone Data Recovery software to retrieve important data from iPhone, iPad or iPod Touch even without backup.
Jihosoft iPhone Backup Extractor Extract and recover all types of data from iPhone backup files, such as camera roll photos, videos, SMS, contacts, reminders, WhatsApp, and etc.

Monday, July 31, 2017

How to upload GIFs to Instagram with iPhone

Instagram is a social network that may not enjoy the popularity of Facebook, but it must be recognized that it is quite cool. Being able to communicate through messages integrated in photographs has his, and certainly opens a world of possibilities for lovers of travel, food, fashion, animals ... Its use is quite simple, the truth is that it is not complicated upload photos And share them.Must Read:How to get more storage on iPhone?
Must Read:How to clear cookies on iPhone ?

But what if we want to upload a GIF? There the thing gets complicated. In fact, I think most of their users would not know how. And is that first of all, actually when you discover this trick you will see that a GIF as such is not, we explain.

And what we are going to do is convert a GIF into a short video in MP4 format, so strictly speaking, it will no longer be a GIF. It sounds complicated, but thanks to an app, we'll do it a wink. Although in the App Store there are many that convert GIFs to videos, but none as fast and intuitive as GifLab.

GifLab

How GifLab Works

GifLab allows us to create a GIF quickly and share it in a couple of taps. In addition, we can add texts, apply filters, control their quality and speed of reproduction, share it in networks ... But let's stick to the part where we upload to Instagram.

1) Save the GIF you want to share on Instagram on your reel.

2) Open GifLAb and select "GIF to Instagram"

3) Selects the GIF and adjusts the playback speed.

4) Click on "Save and share on Instagram", that is, save the changes and upload them to the network.

And that's it. As you can see, it is the simplest thing you can do and the result is simply spectacular. If you like Instagram, this app is going to become a must for you.
Sponsor ads:
Gihosoft iPhone Data Recovery Free
Free iPhone Data Recovery Software for Windows/Mac
Recover up to 12+ types of files, including contacts, SMS, photos, WhatsApp, Viber, notes, etc.
Restore lost data from iOS devices directly or from iTunes and iCloud backup
Recover iPhone data lost due to iOS upgrade/jailbreak, accidental deletion, device lost or broken
Support all the latest iPhone, iPad and iPod Touch
Both Free and Pro version.
If you lost data after you updated to a new iPhone, you can always use Gihosoft iPhone Data Recovery to get the data back from the old iPhone or backup.You may also like: iphonerecovery.com
If you use android phones, please choose Gihosoft Android Data Recovery.
With Gihosoft Android Data Recovery, no longer afraid of data loss!
Gihosoft RePicvid Free Photo Recovery Software provides a free photo recovery software for windows to help users recover the deleted or lost photo for free.
Jihosoft Android Data Recovery: the best Android Data Recovery software for Windows and Mac to recover deleted contacts, messages, photos, videos, WhatsApp and etc from Android devices.

Apple Releases iOS 12.4.2 for Devices That Don’t Support iOS 13

Apple recently launched the iOS 13. As expected some of the older iPhones will not support iOS 13 and will continue running iOS 12. Apple ha...